


Knowing what to put on a busy board is the difference between a board a child plays with for years and one that gets ignored after a week. A good board mixes a few types of hardware, each asking the hands to move in a different way. This guide answers the question "what should a busy board include?" part by part. It covers what each component asks a child to do, which parts suit which age, and what to leave off for safety.
If you are new to the idea, start with our guide on what a busy board is. This article assumes you already know the basics and want to choose or check the components.
How to Choose Parts: Four Principles
Before deciding what to put on a busy board piece by piece, it helps to know what makes a set of parts work together.
- Mix the movements. Twisting, pinching, pressing, sliding and pulling each use the hand differently. A board with ten switches and nothing else only practices one of them.
- Include easy wins and real challenges. A few parts a child can operate right away keep them engaged. A few harder ones give them something to work toward.
- Make results visible. Doors that open onto a picture, gears that turn each other and lights that switch on give a child a reason to repeat the action.
- Leave space between parts. Crowded boards are harder to use and harder to take in. Some empty space helps a child focus on one task at a time.
Busy Board Components and What They Practice
Here is what to put on a busy board, grouped by the kind of hand movement each part asks for. Most good boards include something from every group.
Latches, bolts and slide locks
Sliding a barrel bolt or lifting a latch asks a child to hold one part steady while moving another. That means using both hands together, often with one hand doing more work than the other. Latches that open a small door add a reward: something to find behind it.
Locks with keys
Fitting a key into a lock and turning it combines aiming with a twisting motion of the fingers and wrist. It is one of the harder tasks on a board, so it works best for children who have already mastered simpler latches. Keys should be attached to the board with a short, secure tether.
Wheels, gears and spinners
Turning a wheel or a crank practices rotation of the wrist. Linked gears add cause and effect, because turning one makes another move. Spinners with bright patterns also give visual feedback that younger children enjoy.
Switches, buttons and toggles
Pressing a button or flipping a toggle switch uses one finger at a time. These are often the first parts a young toddler can operate on their own, which makes them a good starting point. Light switches that turn on a small light show a clear result.
Zippers, buckles and straps
Zippers, side-release buckles and hook-and-loop straps are the same fasteners children meet on clothes, bags and car seats. Practicing them on a board is lower pressure than getting dressed in a hurry. Buckles take more finger strength than most parts, so expect them to come later.
Laces and threading
Threading a lace through holes or loops asks for a precise pinch grip and hand-eye coordination. These are the same finger movements used later for holding a pencil. Keep laces short and fixed at one end.
Sliders, abacus beads and mazes
Beads on a rod, sliding tiles and maze tracks ask a child to move an object along a path. Mazes add planning, because the child has to think a step ahead to steer around corners. Abacus rows also introduce counting and color sorting, which fits the age when toddlers learn colors.
Mirrors, textures and sound
Not every part needs to be a mechanism. A shatter-resistant mirror, a few textured patches and a small bell or xylophone add sensory variety. They give a child something to touch, look at and listen to between the harder tasks.
Picking one or two parts from each group above is a simple way to decide what to put on a busy board without overloading it.

Which Parts Suit Which Age
What to put on a busy board changes as a child grows. Age ranges are a guide, so watch what your child can already do and add harder parts as simpler ones become easy.
| Age | Good starting parts | Parts to add later |
|---|---|---|
| Around 1 year | Large buttons, spinners, mirrors, textured patches, simple doors | Toggle switches, large wheels |
| 1 to 2 years | Light switches, wheels, sliders, large latches | Hook-and-loop straps, simple gears |
| 2 to 3 years | Barrel bolts, linked gears, zippers, abacus beads | Locks with keys, buckles |
| 3 to 5 years | Keys, buckles, lacing, mazes | Clocks, matching games, multi-step puzzles |
Our guide to the best age for a busy board covers how long a board stays useful as children grow. For the bigger picture of how hand skills develop, see how to develop fine motor skills.
What to Leave Off a Busy Board
Deciding what to put on a busy board also means deciding what to keep off it. These parts cause most of the safety problems with homemade boards:
- Button batteries. Any electronic part must have a screwed-shut battery compartment. Swallowed button batteries are a serious medical emergency.
- Small magnets. Loose or poorly fixed magnets are dangerous if swallowed, especially more than one.
- Small or loosely fixed parts. Anything that could fit inside a toilet paper tube is a choking risk for children under three. Every part should be screwed or bolted in, not glued alone.
- Long cords and strings. Keep laces and tethers short enough that they cannot wrap around a neck.
- Glass mirrors. Use shatter-resistant acrylic mirrors instead.
- Sharp edges and exposed screw points. Check the back of the board too, especially if it hangs where a child can reach behind it.
Our sensory wall safety guide covers finishes, mounting and inspection in more detail.
DIY or Ready-Made?
Many parents enjoy deciding what to put on a busy board and building it themselves. The hard parts are sourcing child-safe hardware, fixing every piece securely and keeping the layout from getting cluttered. A board also has to be mounted properly if it goes on a wall.
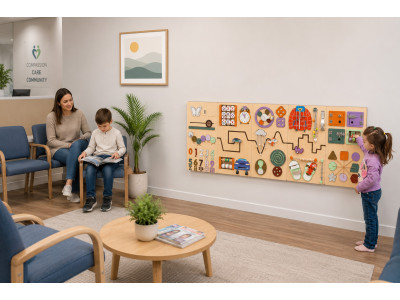
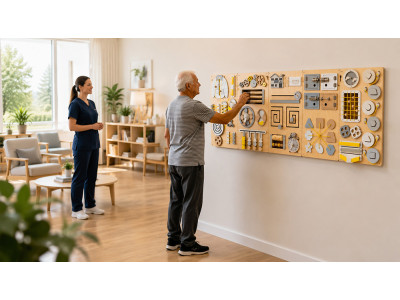
A ready-made board saves that work. Our wall-mounted busy boards come with the components already chosen, spaced and fixed. If you like the idea of choosing the layout yourself, the DIY sensory wall panel kit lets you compose a wall from 24 finished panels. You pick the activities without drilling hardware into a board. To see how our boards are made and checked, read how our busy boards are produced.
A Quick Checklist
When you plan what to put on a busy board, check that your list includes:
- at least one part for twisting, one for pinching, one for pressing and one for sliding;
- two or three easy parts a child can operate on day one;
- one or two harder parts to grow into;
- something with a visible result, like a door or a light;
- a sensory element, like a mirror or texture;
- no button batteries, loose magnets, long cords or small detachable pieces.
A busy board is one good option among many. For other ideas, see our guide to the best toys for sensory development.
Frequently Asked Questions
What should a busy board include?
A good busy board includes parts for several different hand movements: latches or bolts, a wheel or gears, switches or buttons, a zipper or buckle, and something to slide, like abacus beads. Add a mirror or textured patch for sensory variety, and leave out button batteries, loose magnets and long cords.
How many activities should a busy board have?
There is no fixed number. A small board works well with five to eight well-spaced activities. A larger wall panel can hold more, as long as each part has room around it. Variety matters more than count.
What should I put on a busy board for a 1-year-old?
Start with large, easy parts: big buttons, spinners, a shatter-resistant mirror, textured patches and doors that open easily. Mount or place the board low so the child can reach while standing. Add switches and wheels as they get more confident.
Are electronic parts a good idea on a busy board?
A light switch that turns on a small light is a popular part, because the result is clear. Any battery compartment must be screwed shut. Avoid parts that play sounds or flash on their own, since they give the child little to figure out.
How do I attach parts to a DIY busy board safely?
Screw or bolt every part through the board rather than relying on glue alone. Check that screw tips do not come through the back, sand all edges smooth and pull hard on each part before a child uses it. Repeat that check regularly.
Prefer a board with the parts already chosen?
Shop busy boardsPlanning a larger wall for a school or clinic? Browse our sensory wall panels or ask about a custom layout.



Write a comment